

Starting a home studio can seem hard. Billie Eilish’s first album was made in a home setup, showing what’s possible. This article will guide you on creating the ultimate electronic music production studio setup at home.
Let’s get started.
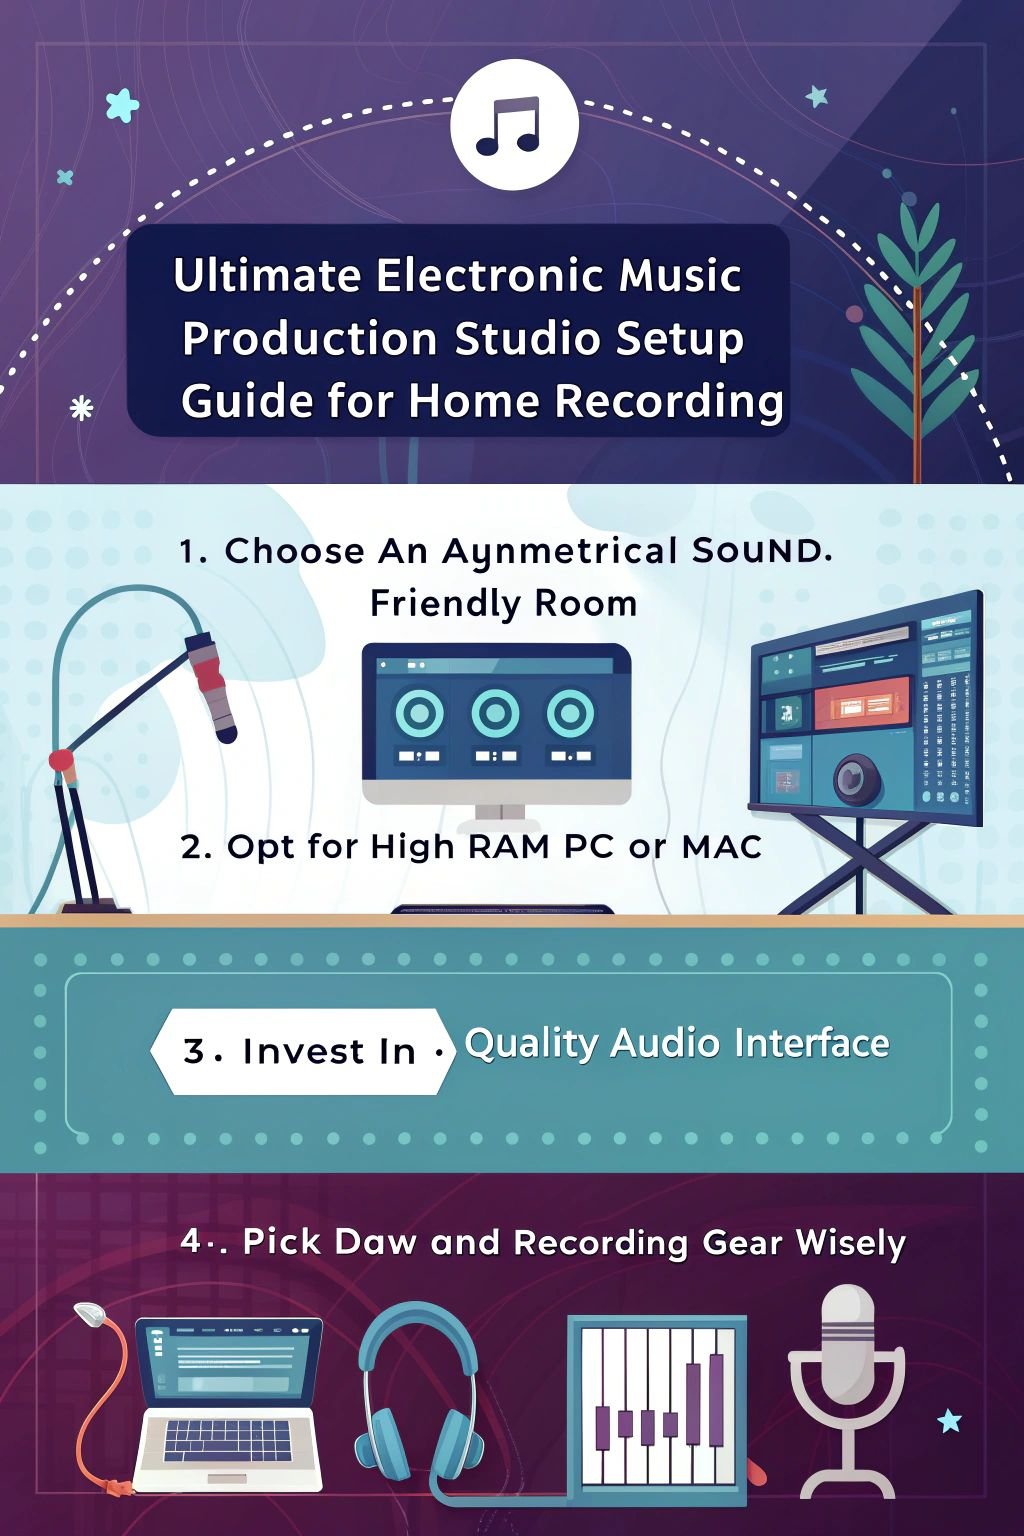
Choosing the Right Space for Your Studio
When setting up your studio, consider the sound isolation and shape of the room. Ensure it can accommodate your equipment and provide an optimal environment for recording.
Considerations for sound isolation
Sound isolation is key in a home recording studio. Using heavy materials blocks noise from coming in or going out. Sealing gaps ensures sound does not escape through tiny spaces. Larger, rectangular rooms work best for keeping your music inside where it belongs.
Cost-effective ways to improve sound isolation include hanging blankets or using soft materials around your space. These simple steps make a big difference in how clear your music sounds.
Good sound starts with good silence.
Room size and shape
Larger rooms are better for controlling sound without distortion. They give you space to set up your studio equipment freely. A big room means less trouble with echoes and weird sounds.
Rectangular spaces work best for music making, like mixing and mastering tunes. This shape helps sound travel clearly.
Rooms that look the same on both sides can mess with bass sounds, causing standing waves. These are bad because they make some notes too loud or too soft. On the other hand, rooms that aren’t symmetrical help avoid this problem, letting all frequencies come through evenly.
So, picking a place with an asymmetrical layout is smart for home studios focused on electronic music production setups.
Essential Equipment for a Home Studio
When setting up a home studio, two critical factors to consider are the computer and audio interface. These foundational elements underpin your entire recording setup and have a significant impact on its performance and capabilities.
Beyond that, selecting the right studio monitors is key for balancing quality with your budget, ensuring accurate sound reproduction while mixing and composing tracks.
Computer: Mac vs. PC
Choosing the right computer for your home studio is a key step. It’s where all the music magic happens. We will compare Mac and PC options.
| Aspect | Mac | PC |
|---|---|---|
| Design | Sleek, user-friendly | Varies by brand, customisable |
| Reliability | High | Depends on brand and build |
| Core Audio Support | Yes, built-in | No, requires third-party drivers |
| Price | More expensive, starting at £1,549 for MacBook Air | Wide range, can be more budget-friendly |
| Recommended Specs | 64-bit OS, at least 8GB RAM | 64-bit OS, at least 8GB RAM |
| Storage | SSD for OS and programmes, HDD for files | SSD for OS and programmes, HDD for files |
Macs are notable for design, reliability, and integrated audio support. They are often the preferred choice in music production. They come with a higher price, but for many, the investment is justified. The MacBook Air has a starting price of £1,549.
PCs provide a selection of features and are easily customisable. They offer an economical alternative. However, they may require additional steps to achieve the audio performance comparable to a Mac.
Both platforms require a 64-bit operating system and at least 8GB of RAM. For storage, a combination of SSD for your operating system and programmes, with HDD for your files, helps maintain an efficient studio operation.
Your choice may be influenced by your budget and specific requirements. Both Mac and PC platforms can provide a reliable base for your studio.
Audio Interface: Key features to look for
Selecting the appropriate audio interface is a significant decision for any music producer. It functions as the core of your home studio setup, converting sounds from microphones and instruments into digital data usable by your computer.
Consider the number of inputs you require. A single performer might necessitate a compact device, such as an EVO 4. Meanwhile, a full band would necessitate a larger number of inputs or perhaps an ADAT expansion to accommodate everyone.
The interface you choose influences your sound quality and workflow.
Interfaces carry varying price tags – from £155 for a Scarlett 2i2 to as much as £2,666 for a Universal Audio Apollo X8. These costs are indicative of the quality and attributes provided.
Seek an interface that aligns with your requirements as well as your budget. Bear in mind that superior interfaces deliver clearer sound but also consume more of your computer resources.
Begin with what you presently require, while also planning for future enhancements.
Studio Monitors: Balancing quality and budget
Picking the right studio monitors is a key step in making music. You need speakers that show you true sound. This helps with mixing and mastering your tracks. For small rooms, like 2.4m x 3m, get monitors with 5-6-inch speakers.
They cost around £300–£400 for a pair. If your room is bigger, like 3.7m x 4.6m, go for larger speakers, between 6.5 to 8 inches.
Big speakers can handle low sounds better but be careful in small spaces. They might not work well if the room echoes too much or has other sound issues. Always think about your space size when choosing monitors.
This way, you make sure they fit well with your setup and help you create high-quality music from the comfort of your own home.
Software Essentials
When considering the core of your studio, the software you select forms the foundation of your entire production experience. Recognizing which digital audio workstation (DAW) and plugins align with your requirements and budget is pivotal.
Whether you’re immersing yourself in Ableton Live’s seamless workflow or aiming for more than just a piece of software from FL Studio, these choices can reveal the intricacies of customised music production objectives.
Choosing a Digital Audio Workstation (DAW)
Picking the right Digital Audio Workstation is a big step for any music producer. You need something that fits your style and needs. Audacity, GarageBand, and Cakewalk by BandLab are great options if you’re just starting out – and they’re free! For more customisation, REAPER stands out with its low cost and helpful community.
Hip-hop creators often go for FL Studio because of its beat-making tools.
Pro Tools is top-notch but comes with a high price tag due to its subscription model. Your choice depends on what kind of music you want to make. Think about the instruments and sounds you will use.
Each DAW has different features, so find one that lets you work smoothly. Whether it’s live tracks or software instruments, choose a platform that helps bring your ideas to life without holding you back.
Essential Plugins and Virtual Instruments
Plugins and virtual instruments are key for making electronic music. They let you add unique sounds and effects to your tracks without needing a room full of gear. Some popular choices include iZotope Music Production Suite 5 for mixing/mastering.
This suite is great because it gives your music a polished feel.
KOMPLETE 14 by Native Instruments offers various sounds, from pianos to synths, suited for all types of music production. It has different price levels, so you can find something that fits your budget and needs.
With the right plugins and virtual instruments, creating professional-quality music at home is more than possible.
Recording Gear
When setting up your electronic music production studio, essential recording gear like microphones, MIDI controllers, and headphones plays a crucial role in capturing and fine-tuning your sound.
Understanding the nuances between condenser and dynamic microphones, exploring the functionality of MIDI controllers and keyboards, as well as selecting suitable headphones for mixing and tracking are pivotal to achieving professional-grade recordings.
Microphones: Condenser vs. Dynamic
Microphones are essential for capturing sound in your home studio. There are two main types to consider: condenser and dynamic microphones. Condenser microphones need power, called phantom power, to work.
Dynamic microphones don’t require extra power.
If you’re on a budget, you can check out the Audio-Technica AT2020 for around £90. For something more advanced, there’s the Shure SM7B at about £399. And if you’re looking for top-notch quality, the Neumann U87 is an option at £2,512.
MIDI Controllers and Keyboards
When it comes to creating music at home, MIDI controllers and keyboards play a crucial role. These devices allow you to input musical notes and commands into your computer for recording and editing.
Some popular brands include Akai Professional, Alesis, Nektar, Arturia, and Novation. Most of these controllers are USB-powered for easy connectivity with your computer.
The KOMPLETE KONTROL S49 MIDI Keyboard and the MASCHINE MIKRO MIDI controller are some examples of widely used equipment in electronic music production studios. These devices provide tactile control over software synthesizers and samplers, making it easier to create expressive and dynamic musical performances.
When choosing a MIDI controller or keyboard, consider your specific needs as a music producer – whether it’s for live performance or studio production – before making a selection.
Headphones for mixing and tracking
When selecting headphones for mixing and tracking, it’s crucial to consider the type. Closed-back headphones are the ideal choice for live studio recording, providing sound isolation.
In contrast, open-back headphones are the preferred option for mixing due to their spacious sound delivery. In terms of budget, the Audio-Technica M20x at £49 serves as a good starting point, while the intermediate range includes the Audio-Technica M50x priced at around £129.
For those interested in advanced options, the Sennheiser HD 650 at £429 represents a solid investment.
Both open-back and closed-back headphones have specific roles in a home studio setup. The choice you make should align with your workflow and desired outcomes when producing electronic music.
High-quality headphones can significantly impact the final mix of your tracks, as well as the quality of recordings captured during tracking sessions.
Enhancing Studio Acoustics
To optimise your studio’s acoustics, consider soundproofing techniques and incorporating bass traps and diffusers. Learn how these enhancements can elevate the quality of your recordings and mixes.
Discover more about enhancing studio acoustics to take your music production to the next level.
Basic soundproofing techniques
To soundproof your studio effectively, consider the following techniques:
- Seal air leaks using materials like acoustic mastic to prevent sound from escaping or entering the room.
- Use mass-loaded vinyl and Green Glue, which are effective at minimising noise transmission through walls and ceilings.
- Combine soundproofing methods with acoustic treatment such as bass traps and diffusers to achieve optimal sound quality in your studio.
- Perform regular maintenance and testing to ensure long-term performance of your soundproofing efforts.
These techniques will help you create an environment conducive to high-quality music production without interference from external noise.
Optimising acoustics with bass traps and diffusers
Properly managing low-frequency sounds is crucial for optimal studio acoustics. To achieve this, bass traps are essential in absorbing and diffusing these frequencies to prevent muddiness and unwanted resonance. Diffusers play a vital role in improving sound distribution within the space, creating a balanced and natural sound environment. When strategically positioned, diffusers help scatter sound reflections evenly throughout the room, enhancing the overall acoustics. Both bass traps and diffusers work together to create an acoustically balanced studio environment that is optimised for recording and mixing music.
Setting Up and Optimising Your Studio Layout
When designing your studio layout, focus on positioning equipment for the best sound quality and ensuring proper cable management for an ergonomic setup. This optimised setup can greatly enhance your music production experience.
Read more about creating an efficient studio layout in our guide to maximising your home recording space.
Positioning equipment for best sound quality
To achieve the best sound quality, follow these steps to position your studio equipment effectively:
- Position studio monitors at ear level and ensure they form an equilateral triangle with your listening position.
- Place acoustic treatment at reflection points on walls to minimise sound wave interference.
- Keep cables organised and away from power sources to avoid interference and safety hazards.
- Use adjustable furniture or stands for ergonomic accessibility and comfort during prolonged use.
- Ensure easy access to frequently used equipment to minimise unnecessary movement during sessions.
Thoughtful positioning of studio equipment not only enhances sound quality but also contributes to your overall productivity and well-being in the studio environment.
Cable management and ergonomic setup
Proper cable organisation is crucial to prevent tangling and equipment damage. Ergonomically designed workstations promote better posture and productivity. Clear pathways created by effective cable management contribute to safety. Utilising cable ties, clips, and sleeves can improve the aesthetic and functionality of the studio.
- Organise cables using ties, clips, or sleeves to prevent tangling and reduce the risk of equipment damage.
- Design workstations with ergonomics in mind to promote better posture and boost productivity.
- Create clear pathways through effective cable management for a safer studio environment.
- Enhance both the aesthetic appeal and functionality of your studio by utilising cable ties, clips, and sleeves for cable management purposes.
Advanced Tips
Now, let’s discuss integrating external gear and analog synths to enhance your studio game. Delve into the realm of professional setups by exploring how to expand beyond a basic home studio.
For more insights on this topic, continue reading our full guide.
Integrating outboard gear and analogue synths
When expanding your home music studio, it’s crucial to connect outboard gear and analogue synths through a multi-I/O audio interface. This allows for seamless linking of devices and ensures proper functionality.
In the world of digital audio workstations (DAWs), applications like Cubase offer latency compensation specifically designed for standard VST plug-ins when integrating additional equipment such as synths and external processors at various stages of production.
Though MIDI automation doesn’t necessarily have to be employed with external processors, it does provide flexibility in the overall creative process if utilised effectively. It should also be noted that regardless of the advancements in analogue modelling plug-ins within today’s technology-driven industry, outboard gear continues to hold substantial value due to its unique characteristics and sonic qualities.
Upgrading from a home studio to a professional setup
Upgrading from a home studio to a professional setup demands attention to equipment quality and acoustics. Consider seeking professional assistance for achieving top-notch sound quality.
Be cautious of common pitfalls such as poor layout and excessive gear.
Professional studios differ significantly from home setups in terms of equipment quality and acoustics, so these factors should guide your upgrade decisions. Also crucial are recommendations for soundproofing, as they can greatly affect the overall sound output.
Conclusion
In conclusion, creating an ultimate electronic music production studio at home is achievable. Pay attention to your space and equip it with the right gear, software, and recording tools.
Consider the acoustics and layout of your studio while keeping your objectives in mind. With dedication and these essential elements, you’ll be ready to start producing high-quality electronic music from the comfort of your home.
For a deeper understanding of how we arrived at today’s studio technology, explore our article on the history of electronic music production.
References
- https://www.homestudiostart.com/home-studio/ultimate-guide-to-choosing-the-perfect-room-for-your-studio-setup
- https://www.soundassured.com/blogs/blog/the-best-room-shape-for-a-recording-studio-learn-about-room-shapes-and-sizes?srsltid=AfmBOoqVulpF4O6vAJ5Rj0szYCWmdASRgEheFj41gjeE_aMgTshK7omz
- https://www.audiomentor.com/audioproduction/what-computer-should-you-buy-for-music-production/
- https://www.musicradar.com/news/the-best-audio-interfaces (2024-10-24)
- https://ehomerecordingstudio.com/home-recording-studio-essentials/
- https://www.musicradar.com/news/the-best-studio-monitors-and-monitor-speakers (2024-11-27)
- https://electromarket.co.uk/blog/home-studio-equipment-what-you-need-for-the-perfect-setup?srsltid=AfmBOopR_3JIgtxKwFbYEk4537PbdzlBEEsw2egNcDE_-GD0mJkpLG-b
- https://www.homestudiotoday.com/best-digital-audio-workstation/
- https://plus.pointblankmusicschool.com/the-ultimate-home-studio-setup-guide-for-2024-on-any-budget/ (2024-04-12)
- https://blog.native-instruments.com/home-recording-studio/ (2023-04-18)
- https://www.gear4music.com/blog/condenser-vs-dynamic-mics/ (2024-07-25)
- https://joby.com/uk-en/creator-journal-blog/dynamic-condenser-microphones-guide/ (2023-07-17)
- https://www.andertons.co.uk/midi-keyboard-controller-guide
- https://medium.com/renoob/midi-controllers-for-your-bedroom-studio-music-making-for-techies-ebe8e1f8c454
- https://www.rtings.com/headphones/reviews/best/studio (2024-11-12)
- https://equipboard.com/posts/soundproofing-guide
- https://smartinfovision.com/blogs/acoustic-studio-setup-home/ (2024-12-26)
- https://www.usemogul.com/post/the-ultimate-guide-to-sound-recording-studio-setup
- https://mixingmonster.com/how-to-setup-a-home-recording-studio/
- https://beenews.com/Download_PDFS/fulldisplay/115005/HomeRecordingStudioBuildItLikeThePros.html
- https://unison.audio/home-studio-setup/
- https://www.soundonsound.com/techniques/using-outboard-gear
- https://www.sweetwater.com/sweetcare/articles/analog-outboard-gear-setup-guide/ (2023-08-25)
- https://currentsound.com/lessons/how-to-make-a-home-recording-studio/ (2020-08-12)


